Showing posts with label Dear Jane Journey. Show all posts

Monday, 22 July 2019

Return to Dear Jane

Thanks to the inspiration of my blogging friend Julie I am returning to work on some blocks for my version of Dear Jane. I am looking at the blocks with a fresh eye and seeing how they can be completed in potentially simple ways. That’s why Brenda Papadakis' book is great as you also get a clear pic of the original block.

Dear Jane quilt block D1

For D-1 Alison’s Guiding Light I appliquéd strips over one piece of background rather than piecing it. I’ve also left off the fiddly borders. I know there’s heaps of resources out there on how to construct the different blocks but I’m just going to think about each one as I get to it - good brain training! This approach was encouraged by Brenda when I was lucky enough to meet her and do a workshop at Linda’s Quilts in the Barn. It’s hard to believe that was nearly five years ago!


I have completed 38 blocks (+ a few triangles) and I’m using all blue Liberty fabrics.


I haven’t forgotten about Dearest Lavender but hubby has had to be re-admitted to hospital in Melbourne so these little blocks are easier to prepare and more portable for all those waiting times.

‘Til next time
Carole 

Monday, 23 November 2015

Liberty Love

A few things happened this week which has led me back to Dear Jane (untouched since February!). Marian finished all of her blocks and put them up on her design wall; I received some Liberty fabric from the G'nT Sisters for my birthday; and I needed some hand sewing in hurry for commuting on the train.  


K-7 Rose of Sharing

Don't you just love Liberty's Strawberry Thief fabric? I think this applique shape showcases William Morris' design perfectly.

The sisters gave me some Liberty blues. One was a hanky - how could you possibly blow your nose into such loveliness? Not me, instead it will become another DJ block.


I was on a mini-roll so here are the blocks I finished over the weekend.

H-12 Hannah Lou's Hearts

C-1 Trooper Green's Badge

K-2 Gandpa's Chickens

D-3 Jason's Jacks

Thought I'd have a bit of fun with the next one,instead of just using a white centre I used some of Liberty fabric from the Alice in Wonderland range - cute!

D-13 Field of Dreams

I'm off to Quilts in the Barn this Sunday with my sister Judy- be sure to say 'hi' if you see us!


Wednesday, 21 January 2015

This could be me!


Have you seen the movie Something's Gotta Give with Diane Keaton and Jack Nicholson? Well, I have just loved this kitchen ever since I saw Jack and Di preparing for a late night snack of pancakes and now I'm very lucky to be getting my own version (not quite as flash but using similar elements). 

Here's the before...


Very 70's with all that pine paneling! 
This is why I haven't had much time for blogging as it has been a a marathon effort for us to completely clear out the kitchen before it was demolished. Everything was stripped back literally to the rafters in the ceiling.


New insulation has been added...


and new plaster walls...

A second large window has been added to mirror the original, it's amazing the difference this has already made, giving extra natural night and garden views.


The ceiling cornices have been done and the holes cut out for power points and new down-lights. We are now in for a fun weekend of painting (not!) so I don't think I'll be doing too much sewing.


Speaking of sewing this is what I've been working on since my last post - the G'nT Sisters had a great retreat down by the sea...


Victoria's famous Great Ocean Road
Judy has posted about it here. I managed to finish Block #24 whilst we were away.

AWS Block #24
I also finished the piecing and appliqué for block #16 and back home I've been auditioning some different flower options for the broderie perse.

AWS Block #16

I have also finished these two blocks.

AWS re-worked Block #2
AWS Block #18

I'm really enjoying playing with fabrics and sorting into dark, mediums and lights for my new Value Proposition Quilt.

Value Proposition Quilt rounds 1 & 2 Block #1
I have decided to use Inklingo to print out the cutting and sewing lines for hand piecing.


I'm also using a doughnut template for individual fussy cutting. This all makes for easy and accurate sewing whilst sitting on the couch after a long day of cleaning, packing etc.


I feel like I've already learnt a lot about tones which helped me select some Japanese fabrics for the first block of Rosie Quinlan's Simply Blessed.


I have even managed to squeeze in a DJ block!


I used the back basting technique for this triangle block and worked it in 3 stages, as some of the pieces were so close together. Can you see the birds in the fabric? I even managed to get one in the small heart at the top of the triangle.

Hmmm, I have managed to fit in quite a bit this month. I hope you have had a great sewing start to 2015.
Cheers
Dianne K. Carole 


Sunday, 12 October 2014

And the winner is....

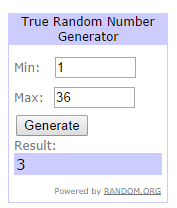
Ann has won the Liberty blues pack - Congratulations!!!


The random generator picked comment no. 3

"What a wonderful workshop! I am collecting Liberty prints to make a bag from hexagons."

Ann, because you are a non-reply blogger can you please email me by the end of the week so that I can post the fabrics out to you? 

Sorry I was a bit late with the draw but I was away on a sewing retreat and was completely off-line for 3 days - more about that in my next post :) 


Wednesday, 8 October 2014

Four Corner Press B-13 & Uncle Homer A-6

At the Dear Jane weekend in the Barn, Tiki shared her grid showing all of the delicious fabrics she had used for her DJ blocks.


I thought it was a great idea and Brenda encouraged us to do the same. She assured us that even with a small 1/2" square we would still be able to recognise our fabrics. 
I have started my grid.


I have finished two more blocks. 
Dear Jane quilt block Four Corner Press B-13
Four Corner Press B-13
Name of block: Four Corner Press B-13
Name of Liberty fabric: Small Susanna (blue)
Technique/s: Machine piecing
Number of pieces: 9
Total number of pieces:77
Tips: Great opportunity to fussy cut. Use a small square ruler to do this for the centre and corner squares.


Dear Jane quilt block A-6 Uncle Homer
Uncle Homer A-6
Name of block: Uncle Homer A-6
Name of Liberty fabric: Mabelle (blue brown)
Technique/s: Machine piecing
Number of pieces: 9
Total number of pieces:86
Tips: Once again a great opportunity to fussy cut. Use a small 4" ruler to do this for the centre and corner squares.

I am making these relatively easy machine pieced blocks whilst I am waiting to set myself up with the Dear Jane EQ software. Then I will be able to print out freezer paper and foundation papers for the appliqué and more complex blocks. 


Monday, 6 October 2014

Papa's Star and Chicken Tracks

Thanks for all of your lovely comments and encouragement last week on commencing my Dear Jane. I have completed Papa's Star that I started at the weekend workshop with Brenda Papadakis and finished later for 'homework'.

Papa's Star G-6

It could also be set on an angle as Jane did in the original quilt. Inspired by Frances' Nearly Insane posts I am going to try and document my Dear Jane blocks in a similar way.

Name of block: Papa's Star G-6
Name of Liberty fabric: Sweet cherries (blue) 
Technique/s: Freezer paper machine piecing
Number of pieces: 27
Total number of pieces:27

Tips: The little flying geese in the centre are folded not sewn (bit like a James Bond martini - shaken but not stirred).

My next block for this post is Chicken Tracks - don't you just love the name? I wanted to make a 9 patch variation and luckily for me Chris had recently posted a tutorial on her new blog Quilting Jane at the Farm. Here I am working virtually with Chris on my iPad mini.


It was a beautiful spring day yesterday and I just had to incorporate some daffodil yellow.


Name of block: Chicken Tracks J-7
Name of Liberty fabric: Ibstonian (blue, yellow) 
Technique/s: Machine piecing
Number of pieces: 41
Total number of pieces:68

Tips: Follow Chris' tutorial. I used Clover fork pins to help match the seam joins (be careful not to sew through them, you need to 'walk' over them) and a stilleto for keeping the two layers together at the end of the seam.

Clover fork pins

Using a stilleto
 Please bear with me whilst I am experimenting with Blogger, trying to get this to appear under my Dear Jane Journal page.